Thursday, December 31, 2009

My Own First Attempt at Chocolates

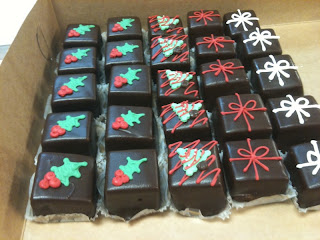
I adore chocolate.....all things chocolate! I bought a box of molds off Craig's List and wanted to play with them so started with a fairly easy recipe for chocolate truffles but then adapted it a bit to make the chocolate more moldable. I used olive oil to make the chocolate a more fluid consistency to pipe into the molds. The result was amazing.....especially for my first attempt at this. I had seen a few recipes that used olive oil with chocolate but was skeptical as it seems an odd combination. However, it does make the chocolate more pliable and doesn't leave any sort of aftertaste. It seemed to cut the extreme sweetness that truffles can sometimes have as well. My husband loved them and so these will go on the "success/make again" list for the future!


Chocolate Truffles

(Adapted from Helen of Tartelette)
8 1/4 oz (250gr) bittersweet dark chocolate (chopped, broken, or chips)
1 stick (115gr) unsalted butter, at room temperature
2 large egg yolks
1 cup (125gr) powdered sugar, unsifted
2 tablespoons olive oil
Melt the chocolate in a large bowl set over a pot of simmering water (make sure that the bowl fits snuggly over the pot so that very little steam escapes). Stir occasionaly.

Remove from the heat and add the butter, one tablespoon at a time. Stir until completely incorporated. Add the egg yolks and powdered sugar whisking until the batter is smooth. Add olive oil. Return to double boiler until super smooth consistency. Pipe into moulds.

Refrigerate until firm, about 2 hours.
(I did add finely ground toasted hazelnuts to the mix that I had left over from another recipe)

Monday, December 28, 2009

Wedding Cake Balls and Cake Pops

What we worked on today at Paige's. Colorful and fun.... it seems cake pops/balls are increasingly popular for events such as weddings, etc.


And the genious behind it all.....Paige!!

The Pizza Man Cometh...

We will  never purchase pizza again in this house.......because we are hooked on making it ourselves. And I mean it when I say "we" as even Oscar is in on the act!!


See Oscar Roll


Roll Oscar Roll


Break Time! (note pizza in oven in background--- awesome!)

We used a super simple recipe for thin crust dough and then added our own favorite toppings. It's actually cheap to make, easy and so rewarding to know you can do it yourself and it tastes just as good (even better actually) than what you order from local pizza chains.

Sunday, December 27, 2009

Watch Your Nutella Closely.....

So for Christmas....I thought I would try a couple of new recipes from some of my favorite bloggers. One of the cookies called for Nutella. Off to the grocery store I went on Christmas Eve (read: total chaos) to pick up a jar of the good stuff. I get to the baking aisle and it's utter madness --- obviously the most crowded aisle in the store. I make my way to the Nutella to find only 2 jars remaining. One is dented severely and so I have to opt for the larger container. Fine....I grabbed it and off I go to the dairy aisle--- further chaos ensues. While checking the dates on the milk--- I turned my back on my cart for a few seconds and went I turned back around--- SOMEONE SWIPED THE NUTELLA FROM MY CART!!!! What has this world come to???
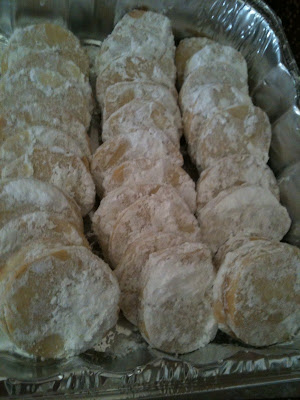
Anyways...I did eventually get a jar of the yummy hazelnut/chocolate goodness and managed to make it out of the next store without it being heisted. Whew!!! Without further ado....here are the recipes and pictures of the Nutella Pinwheels and Lemon Meltaways that I made for the festivities. Looking forward to 2010!!!


Nutella Pinwheel Cookies


Yield: 25-30 cookies

125g / 1 stick butter, softened
½ cup sugar
1 egg yolk
1 tsp vanilla
1 heaped cup sifter flour
¼ cup Nutella to spread, a little more won’t hurt, but be careful not to overdo lest it ooze!
2-3 tablespoon, toasted, chopped hazelnuts

Preheat oven to 175C/350F.
Mix the butter and sugar together till creamy.
Mix in the egg yolk and the vanilla. The mixture should be light and well combined.
Stir in the flour and refrigerate the dough for 15 minutes so that it can firm up and facilitate easy rolling.
Next, roll out the dough into a rectangle of ¼ inch thickness.
Spread the Nutella making sure to leave one finger space on all four sides. Again, we don’t want the Nutella to ooze out!
Sprinkle over the chopped hazelnuts and roll up the dough.
Refrigerate for another ten minutes before cutting the slices.
Lay the slices on a baking sheet and bake for 12-15 minutes till slightly golden at the edges. Baking time will vary depending on how thick you've cut them. Colour is a good indication.
Now there are two ways you could cut the slices - with a knife (surprise!) and a better, neater way would be with a firm thin wire. Enjoy!


Lemon Meltaways


160 grams butter, at room temperature
125 grams powdered sugar
zest of 2 lemons
2 Tbs lemon juice
1 Tbs vanilla
260 grams flour
20 grams cornstach
1/2 tsp salt
Powdered sugar for rolling

Cream together butter, sugar, zest and vanilla. Add lemon juice and mix. Add the flour, cornstarch and salt to the butter mixture and mix until combined. Form the dough into a log that is about 2 inches in diameter. Wrap it in parchment and refrigerate it overnight.
Cut the log into 1/2 inch disks and bake at 350F for about 12 minutes. Let the cookies cool slightly and roll in powdered sugar while they are still warm. Note: This recipe is set up in such a manner that you will  need to have a scale to weigh your ingredients--this is really the preferred method for professional bakers and the like. It's much more precise and provides more consistent results. I do highly recommend purchasing a simple digital kitchen scale for baking purposes --it's worth the small investment of $25 or so at a local retain chain.

Wednesday, December 23, 2009

Delicious Dunks for Your Coffee

I made a batch of biscotti that turned out quite tasty. They are simple to make--- and much cheaper to bake yourself than to purchase at the store or a bakery! Actually, I am finding out just how much cheaper it is to make just about everything yourself and it's so much more rewarding knowing when you bite into said baked good...that YOU made it with your own hands. Hooray!!


Almond Biscotti


Adapted from Bon Appetit, December 1999

They’re supposed to make 3 dozen, but my batch yielded at least 45. Also, I dipped the bottoms of these in melted semi-sweet chocolate for an added zing...

3 1/4 cups all purpose flour
1 tablespoon baking powder
1/3 teaspoon salt
1 1/2 cups sugar
10 tablespoons (1 1/4 sticks) unsalted butter, melted
3 large eggs
1 tablespoon vanilla extract
1 tablespoon orange liqueur
1 tablespoon orange zest
1 cup whole almonds, toasted, coarsely chopped or sliced almonds

1 large egg white

Position rack in center of oven and preheat to 350°F. Line baking sheet with parchment paper. Sift flour, baking powder and salt into medium bowl. Mix sugar, melted butter, 3 eggs, vanilla extract, orange liquer and zest in large bowl. Add flour mixture to egg mixture and stir with wooden spoon until well blended. Mix in almonds.

Divide dough in half. Using floured hands, shape each dough half into 13 1/2-inch-long, 2 1/2-inch-wide log. Transfer both logs to prepared baking sheet, spacing apart. Whisk egg white in small bowl until foamy; brush over top and sides of each dough log.

Bake logs until golden brown (logs will spread), about 30 minutes. Cool logs completely on sheet on rack, about 25 minutes. Maintain oven temperature.

Transfer logs to work surface; discard parchment paper. Using serrated knife, cut logs on diagonal into 1/2-inch-wide slices. Arrange slices, cut side down, on same baking sheet. Bake 12 minutes. Turn biscotti over; bake until just beginning to color, about 8 minutes. Transfer to rack and cool.

Do ahead: Can be prepared one week ahead, though mine have kept even longer. Store in airtight container at room temperature. 

Tuesday, December 22, 2009

Sorority Girl's B-day Cake....


Another amazing cake by Paige!!!

Proud Baker Moment

So Saturday night Oscar had a holiday party for his job and "we" needed to make something to bring along. I searched my recipes for something that would be tasty and impressive...without TOO much work. Considering I had a list of 100 things to do that day on top of my transcription, time was short. I chose a recipe for raspberry/chocolate/pecan rugelach and dug in. With only 2 hours until party time....I was pushing the limits to get this task done. Considing the dough needs to chill for an hour....I was insane to attempt this as I had never made them before and they are tricky. However, I was very proud to complete the task and get them to the party and myself without any hiccups (except for the flour handprints spotted on my jeans just before entering the party ....whew!!). The rugelach were a big hit and several people asked for the recipe. I AM BAKER....hear me roar....HA!!!


Raspberry Rugelach (from the book Baking at Home with the Culinary Institute of America, 2004, John Wiley & Sons)


2 cups All Purpose flour, plus more for dusting

1/4 tsp. salt

1 cup unsalted butter, softened

8 oz cream cheese at room temperature

1 and 1/2 cups pecans, toasted

1/3 cup chopped semisweet chocolate (optional; I used mini chocolate chips)

1 cup raspberry jam (I used seedless)

1/3 cup cinnamon sugar (1/3 cup sugar mixed with 1/2 tsp. cinnamon)

egg wash (1 large egg, beaten with 2 Tbsp. milk or cold water; I used water)

Sift the flour and salt into a bowl and set aside.

In a mixer, using the paddle attachment, cream together the cream cheese and butter on medium speed for about 2 minutes. With the mixer on low speed, mix in the dry ingredients just until combined, scraping the bowl as needed to evenly blend. Tightly wrap the dough and chill it for 15 to 20 minutes, or until it's firm.

Roll the dough out on a lightly floured surface until it's 1 inch thick all over. Fold the dough over into thirds, like you'd fold a letter. Wrap the dough and chill it for at least 1 hour, and up to 24 hours.

To prepare the filling, combine the pecans and chocolate in the bowl of a food processor. Pulse repeatedly until the mixture forms a coarse paste. (I pulsed until a bit of it held together when I pressed with my fingers; it was not truly like "paste" for me, but it worked just fine the way it was.) Dump it all into a bowl, add in all of the jam, and stir until it's well combined.

When you're ready to assemble and bake, preheat your oven to 375 degrees. Line your cookie sheets with parchment paper. Divide the chilled dough into 4 equal pieces. Return three of them to the fridge while you work on the first one.

On a lightly floured surface, roll the dough into a 10" circle. Spread 1/4 of the filling evenly all over the circle, extending almost right up to the edge. Sprinkle 1/4 of the cinnamon sugar evenly over the filling. Cut the circle evenly into wedges; 16 if you want very small rugelach, 12 if you'd like them slightly larger (I used a sharp pizza wheel to cut them; I made mine into 12 wedges and they were still small). Roll the wedges up, starting at the wide end. Curve the ends in slightly, like a crescent, if you wish.

Place them on your lined cookie sheet. Brush them gently with the egg wash, and sprinkle each one with cinnamon sugar. Bake them until light golden brown, for approximately 25 to 30 minutes (mine only took about 22 minutes). Transfer the finished rugelach to wire racks and cool them completely before storing or serving them.

Makes 48 to 64 cookies.

Sunday, December 20, 2009

Holidays in Full Motion at Paige's Bakehouse

It's amazing what an article in the newspaper can do for your business! Paige has been swamped with orders after her story ran in one of the local publications. Cake pops galore! It's been great for Tracey and me as students since she needs us to do more and thus we get more exposure. Cake pops, pies, truffles, petits fours, cakes....you name it...it's flying out of the pastry cases!


Adorable birthday cake!


Fondant toppers for petits fours....


Petits fours....substantial!


More.....aren't they so holiday-ish??!


Saturday, December 19, 2009

Time to Make the Chocolates

Something I have always enjoyed is chocolate-- in fact I am quite addicted to all things cacao! I am really interested in the whole process from start to finish and would love to do some of my externship hours with a chocolatier. Chocolate is a real artform and when you see someone work with it making truffles, bon bons, sculptures, etc....it just draws you in. Plus, it's super yummy and so a total win-win for me. Chef Todd did a demonstration for us on how to make bon bons one day. He filled the dark chocolate ones with carmel infused ganache and the white chocolate ones had egg nog ganache. YUM. It was fun to watch but I want to get my hands on those chocolate molds and give it a try for myself. I have written to a couple of local chocolatiers to see if they will take me under their wing so....fingers crossed!


Filling the molds with tempered dark chocolate...


Chocolate setting in the mold before being piped with ganache filling....


Friday, December 18, 2009

Catch Up!!!

Well...school is out for the next 2 weeks because of the holidays so I can take a bit of a breather and double up on my transcription and externship hours during my "break." We are still working on breads in class and have made some wonderful things including French baguettes, challah, brioche, yeast rolls, etc. Pics to follow!

Braided challah about to go in the oven...YUMMO!


Can you just taste them??? Shiny with butter....oo la la


More yummy challah...


We also made cookies the last few days before the break...


Almond meringues dipped in chocolate


Peppermint meringues.....striped with food color. These need work to perfect but they are tasty and fun to make. I will try them again for sure!!!

Saturday, December 12, 2009

Bakehouse business...

Paige has been busier than usual at the bakehouse so I feel we can really get in there and help her out during the holidays. Yesterday we made cake pops, decorated gingerbread cookies, and made chocolate chip biscotti. The phone was ringing off the hook most of the day and we had a steady stream of customers who slowly emptied out the pastry cases!!! Some pictures to enjoy...

Easy to make and delicious chocolate chip biscotti


They were later dipped partially in chocolate and nuts....YUMMO!


Forgot the name of these...maybe whiskey bon bons?


Shortbread cookies decorated with chocolate...


Paige's specialty....cake pops dipped in chocolate...

Thursday, December 10, 2009

Chocolate....nuff said!!!

It was definitely reward time. After a super busy week with work, school, exams, etc, I felt a reward was more than deserved. So...what better than chocolate. My classmate/externship buddy Tracey and I decided to head to the Lost Pines of Bastrop to visit http://www.roscar.com/ Oh my gosh....heaven tucked away in the corner of a quaint rural town. With it being Christmas season, the pine trees surrounding the log cabin that houses these delicious treats just seemed like a page out of a fairytale.....a very yummy, chocolatey one.

How cute is this???
These aren't just any chocolates. The chef/owner (Dutch-born Frans Hendriks) is a european trained master chef who uses only the finest Belgian chocolate for his unique artisan confections. He doesn't use oils or extracts to flavor the chocolates but rather uses a process to somehow take the actual item to be used as flavor and reduce it a concentrated form. Hard to explain but once you see how fragrant and flavorful the chocolates are, you realize these are unlike any others. I have never in my life tasted such amazing flavor combinations in chocolate. I think my favorite was the lime/tequila/jalapeno. Sounds odd...right? But it's sooo wonderful and you don't really taste the jalapeno-- it's more of a sensation of heat at the back of your tongue. I brought a small gift box home so husband could enjoy as well. They have so many different choices between their bonbons and truffles. I chose the champagne, triple dark pomegranate, horchata, cajeta, passion fruit with brandy and a cabernet sauvignon. They also let you sample a few before you try...so of course we indulged. They had combinations with herbs that were out of this world (basil, ginger, mint).  As well, they do offer Anderson's coffee, loose leaf tea, packaged cocoa nibs and a few other treats. What an amazing place. We did inquire to see if he would allow us to do some of our externship hours with him for school ...finger's crossed as we wait on his response. For sure....we will be returning to Roscar for more of their very special chocolates!!


Can you just taste them???


With so many choices...it was really hard to narrow down the picks. You could do a lot of damage to your wallet in this place!


Savor the flavor on the porch a while...


Quaint inside...


Best to take a picture to make them last!! Truly amazing chocolates...Roscar!

Nail Biter and then a reward....

So...today we had our first practical exam. This means we took a written test and then also had to bake two items for the chef as part of the exam. It was a bit nervewracking because the chef stood by each of us to make sure we were using the right mixing methods, scaling components properly, etc. We had to make scones and also an apple cinnamon loaf recipe. Not terribly difficult at all but just having him standing there watching you each step of the way can get you a bit unnerved! I did great on both the written exam (100!) and the baking portion so.....hooray!!! We will continue to be tested like this in the future and with more and more difficult recipes so...better keep my game face on from here forward! As a reward...my friend Tracey and I took a field trip after class to Roscar Chocolates in Bastrop. See next post for yummy details....

Wednesday, December 9, 2009

And then there was Bread....

I am sooo excited that we are starting to work on yeast breads. We will cover them all from basic sandwich bread (pullman loaves) to the complicated laminated doughs with croissants, puff pastry, danish, challah, baguettes, etc. Today, we got a quick lesson with brioche and focaccia. I am a bread enthusiast so will be paying extra close attention to these next two weeks worth of baking.


First up....brioche in molds. Buttery, light and yummy! My favorite...


Focaccia with parmesan cheese....very tasty!


Focaccia rolls with rosemary ...

Tuesday, December 8, 2009

Busy Bakers Bake Busily .....

Lots going on in class the last few days. Working on quick breads and we are broken down in pairs to work as teams. I have a great gal I am working with this week....she is a natural and I like her style....very easy going. Go team 4 (that's us!!)....So...we have been making muffins, banana bread, waffles (from scratch MUCH better than any store bought mix!!), mini eclairs, cream puffs, beignets, crepes (man I love me some crepes!!), etc. We are going to have a test on Thursday both written and practical where we have to make 2 items start to finish for the chef. YIKES!! Some pictures of the spoils....


This is called Paris Brest...it's choux pastry filled with pastry cream and whipped cream with almonds on top.


Mini eclairs and cream puffs....


Master of Ceremonies...Chef Todd who has the patience of a saint to deal with 10 women at once in a hot kitchen!!