Saturday, October 16, 2010

New state, new job, new life! New New New!

It's been a while since my last entry. I have a good excuse this time though....we moved! This time the move was not just across town but rather a 1300 mile trek from Austin, TX to Naples, FL! We have been wanting to move to Florida for quite a while and the realization finally came together with the help and support of family and friends! I am so thankful for all of you that assisted in this journey-- without you we could not have made it! We have settled into our cute little rental house in Naples Park. Oscar is enjoying the perks of this house very much!
The 1300 mile caravan included myself, my brother David and my mom. I drove my Corolla -- with my THREE passengers who included a Great Dane, Lab and Pomeranian. They were real troopers! Here they are unwinding on the hotel bed after day one of the journey.


Mom and David were in the Budget truck leading the way....so this is the view I had for the entire journey.

Even now when I see a Budget truck...I have the urge to stay behind it and follow!!

Typical Florida pit stop! 
 This makes it all worth it .....my first Naples sunset!


Many, many more posts to follow from sunny Florida!

Sunday, September 19, 2010

Dulce de Leche filled Macarons


The overwheming urge hit me today to try a new recipe for French macarons. This time, I used the French meringue method vs the usual Italian meringue. They were much easier since I did not have to cook the sugar syrup as is required for the Italian meringue. However, I am not sure the macs were as dense as they normally are. I was happy with the taste though and they looked nice with big "feet"! So, I think this merits more experimentation with the French meringue method. I cheated and purchased the dulce de leche instead of making it. However, I did make the effort at least to drive to the Mexican market around the corner where they actually did make it from scratch. So does that give me just a few extra points?? I think so!

Piped and ready to bake!

Can't you just taste them?


Saturday, September 4, 2010

A Day At The Office

Super busy at the bakery today. It seems being a few degrees cooler outside makes people actually want to leave the AC and venture out....to eat cupcakes! Snagged a few pics between baking, icing, decorating, etc...


Saturday, August 28, 2010

Special Order...Mom's Birthday Cupcakes

The request was white cupcakes with vanilla icing. Easy enough! I made vanilla bean icing just to add a bit of fancy. They were delicious (if I do say so myself) and dissappeared quickly. Recipe to follow.


Wednesday, August 4, 2010

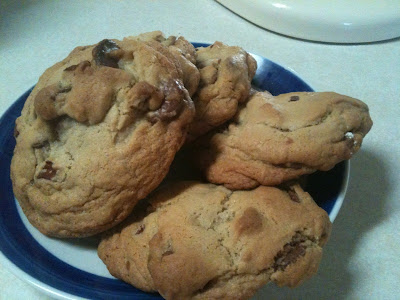
Chocolate Chunk Pecan Cookies


Recipe: Soft and Chewy Chocolate Chip Cookies (from The Food Network)


I love these because they are not too sweet and have great flavor. Make sure you use quality chocolate chips, real butter and good vanilla as this will make a huge difference in your outcome. Don't overbake as they are supposed to be chewy!

■1/2 cup (1 stick) unsalted butter
■3/4 cup packed dark brown sugar
■3/4 cup sugar
■2 large eggs
■1 teaspoon pure vanilla extract
■1 (12-ounce) bag semisweet chocolate chips, or chunks
■2 1/4 cups all-purpose flour
■3/4 teaspoon baking soda
■1 teaspoon fine salt
(I added 2/3 cup chopped pecans which some folks would consider optional!)

Evenly position 2 racks in the middle of the oven and preheat to 375 degrees F. Line 2 baking sheets with parchment paper or silicone sheets. (If you only have 1 baking sheet, let it cool completely between batches.)

Cream butter and sugars until smooth and light. Beat in eggs one at a time. Add vanilla.
Put the butter in a microwave safe bowl, cover and microwave on medium power until melted.
Whisk the flour, baking soda and salt in another bowl. Stir the dry ingredients into the wet ingredients with a wooden spoon; take care not to over mix. Stir in the chocolate chips or chunks (and this is when you would add the pecans or other nuts if you choose to do so).

Scoop heaping tablespoons of the dough onto the prepared pans. Wet hands slightly and roll the dough into balls. Space the cookies about 2-inches apart on the pans. Bake, until golden, but still soft in the center, 12 to 16 minutes, depending on how chewy or crunchy you like your cookies. Transfer hot cookies with a spatula to a rack to cool. Store cookies in a tightly sealed container for up to 5 days.

Monday, August 2, 2010

Madeleine Monday


This following recipe was originally published in the cookbook “Chef Daniel Boulud – Cooking in New York City.”


Madeleines

Makes 6 dozen small or 1 dozen large madeleines
◦3/4 cup all-purpose flour
◦1 teaspoon baking powder
◦Pinch of salt
◦1/4 cup plus 2 tablespoons of granulated sugar
◦2 large eggs
◦1 tablespoon honey
◦1 tablespoon packed light brown sugar
◦finely grated zest of 1 lemon
◦6 tablespoons unsalted butter, melted and kept warm
◦Confectioners’ sugar, for dusting

1. In a small bowl, sift together the flour, baking powder and salt. Set aside.

2. In a medium bowl using a wire whisk, mix the eggs, sugar, honey, brown sugar and lemon zest. Add the flour mixture and whisk just until combined. Add the melted butter, stirring just until incorporated. Cover the bowl with plastic wrap and refrigerate for 1 hour.

3. Preheat the oven to 400°F. Liberally spray either a nonstick 20 mold or 12 mold madeleine pan with nonstick cooking spray. Place the batter in a pastry bag fitted with a medium round tip. Pipe the molds two-thirds full, using about 1 teaspoon of batter for the 20 mold pan and 2 tablespoons of batter for the 12 mold pan.

4. For the small madeleines, bake until the centers rise and the edges are golden brown, about 4 minutes, rotating the pan halfway through the baking. For the large madeleines, bake for 5 minutes, reduce the heat to 350°F, rotate the pan halfway, and continue baking until the centers rise and the edges are golden brown, about 5 minutes. Remove from the oven, invert the pan and tap it against the counter to release the madeleines. Serve the madeleines warm, dusted with confectioners’ sugar.

Tuesday, July 20, 2010

Key Lime Tart

Key Lime Tart
(recipe to follow)

Saturday, July 17, 2010

Bananas for Breakfast....With a Dash of Chocolate!


Banana Chocolate Chip Muffins

Ingredients:
3 very ripe bananas
125ml vegetable oil
2 eggs
250g AP flour
100g brown sugar
dash salt
1/4 tsp cinnamon
1/8 tsp nutmeg
½ teaspoon baking soda
1 teaspoon baking powder
150g dark or milk chocolate morsels (I used Ghirardelli bittersweet)

Preheat the oven to 350F and line a 12-bun muffin tin with muffin papers.

Mash the bananas and set aside. Pour the oil into a bowl and beat in the eggs. Place the flour, sugar, baking soda and baking powder into a large bowl and mix in the beaten-egg-and-oil mixture, followed by the mashed bananas. Fold in the chocolate morsels and then scoop equal quantities in the prepared muffin tin. Bake approximately 20 minutes.

Thursday, July 15, 2010

Fruit Salvation

What to do with fruit that is about to spoil?? It's so expensive and you have to use it quickly or it will go to waste. It's a love/hate relationship I have with fresh fruit! So today I decided to use up a few things about to go to waste in the fridge and made a blueberry, strawberry, almond cream and puff pastry tart. Colorful and delicious while avoiding fruit waste...


Monday, July 12, 2010

Pink Macarons

I tried a new method for macarons today. Instead of the more involved Italian meringue method where you cook the whites with boiling sugar syrup, I opted for the French meringue method. Here you basically whip the whites to stiff peaks and then fold in your almond flour, etc. These were easy enough but didn't grow sufficient "feet." The bottoms were cooked nicely and they tasted great. I may try again and see if I can get better results as they are so much easier this way. Just a few pics of the experiment...


Friday, July 9, 2010

Yellow/Buttermilk cupcakes with Strawberry Buttercream


Recipe

Ingredients: (this makes 24 cupcakes)

3 cup pastry flour
1 tbsp baking powder
1/2 tsp salt
1 cup butter, softened
3 tsp vanilla bean paste/vanilla bean extract/vanilla bean seeds (I went with vanilla extract)
1 3/4 cups super fine sugar (I used regular sugar)
4 large eggs
1 1/4 cups buttermilk

How-to:

Preheat oven to 350F. Line muffin pans.
In a medium bowl, sift together flour, baking powder and salt.
In a large bowl, beat together butter, sugar and vanilla bean paste for 4 minutes, until light and fluffy.
Beat in the eggs one at a time until thoroughly combined.
Add 1/3 of the flour mix, then 1/2 of the buttermilk, then 1/3 of the flour mix, then the rest of the buttermilk, and finally the remaining 1/3 of the flour mix, making sure only to mix for a few seconds after each addition (you don’t want to overmix). Make sure to scrape down the side of the bowl as well.
Scoop the batter evenly into the muffin pans, making sure not to overfill it because they will rise a lot.
Bake for 20 to 22 minutes. Rotate the pan halfway through to ensure even baking.
Let the cupcakes cool in the pan for 5 minutes before removing them and letting them cool completely on a wire rack.
Only when they are completely cooled proceed to top them off with the icing of your choice. I went with a strawberry buttercream made with the Italian meringue method. These are delicious!!!

Thursday, July 8, 2010

Delicious Tart

I whipped this up last minute as I had some fruit in the fridge that I didn't want to go to waste. Of course, I had to add some chocolate....

This is a strawberry, kiwi, whipped milk chocolate ganache tart in a buttery pate sable crust. It's a simple recipe that looks impressive and tastes equally so!


And the obligatory shot of Dom the Pom looking as cute as ever!

Wednesday, April 7, 2010

The End Leads to the Beginning

Today was my last day of school. While in the moment school seemed to take forever to get through, it actually did fly by now that I look back! We spent the last two weeks in the classroom developing menus, costing out recipes, mock interviewing, updating resumes, and taking a few field trips. On the final two days of class, we were back in the kitchen preparing items for the final buffet. A couple of pictures of what I made:
Yummy...pate a choux filled with diplomat cream.


I also assisted in making rolled truffles in three different flavors and some lemon wafer cookies drizzled with a lemon glaze. Everyone was working diligently to get their items preparted and Chef Natalie was there to support us all the way. She was a fantastic instructor for our final two weeks of class and I could not have asked for a better person to finish out the program. Thank you chef Natalie (you still owe me that secret spicy pasta sauce recipe!). And now...on to the next chapter-- stay tuned!
(How I really made it through school...HA!)

Friday, March 26, 2010

Celebratory Tart!

To mark the end of the wedding cake project and its success-- I made a delicious strawberry tart with lemon-honey marscapone filling and whipped cream on top. It was light, delicious and the buttery sable crust scrumptious! I have included the recipe:

Sable Crust:
120 grams butter, at room temperature
80 grams powdered sugar
1/2 egg
1/2 tsp vanilla
180 grams cake flour
40 grams almond meal (ground almonds done in food processor to fine consistency)
Procedure:
In a bowl, whisk flour and almond meal until combine. Set aside.

Place butter and powdered sugar in a medium bowl. Mix with an electric mixer until combined.
Add the egg and vanilla into the butter mixture, beat the batter until smooth.
Add the flour mixture. Using a rubber spatula, mix the batter until just combined.
Shape the dough into a disk with 1/2-inch thickness, then wrap it with a piece of cling wrap. Keep in the fridge for at least one hour.
Preheat the oven to 350 F
Roll the dough out on a floured surface. Fit dough into tart pan(s). For me, this dough made enough for two 9 inch tarts (I only made one tart so froze the remaining dough)
Bake tart shell at 350F for about 20-25 minutes or until golden brown.

Marscapone Filling
250 grams marscapone cheese
2 tablespoons granulated sugar
2 teaspoons honey
1/2 tsp vanilla extract
Zest from 2 small lemons
Procedure:
Incorporate ingrediants well but do not overmix as marscapone will turn to butter form easily!

Assembly:
Melt a few tablespoons of dark or bittersweet chocolate. Brush this with a pastry brush in the bottom of the prebaked and cooled tart shell. Allow chocolate to set before proceding. This keeps the tart shell from getting soggy by creating a moisture barrier. Next, spread the mascapone filling into the tart shell using an offset spatula to make it even and smooth. Cut strawberries into even slices and arrange in a spiral over the marscapone filling.  You can either cheat and top with store bought whipped cream (oh no!) or easily whip up some heavy cream with a bit of powdered sugar to sweeten and pipe this over the strawberries in any design you choose. Slice and enjoy!

Thursday, March 25, 2010

Cake...COMPLETE!!

We finished up our cakes today....whew! It was quite a task and I am very proud that I was able to complete this assignment from start to finish on my own. AND...I think it turned out pretty nice for a first timer! I have a long way to go but with practice....it will come. Here's the wine country themed wedding cake:

Only 8 more classes until we graduate. Home stretch!!

Wednesday, March 24, 2010

Final Project-- Wedding Cake

As our final project for school, we are required to design, cost out, bake/decorate a wedding or celebration cake. As I have never done anything like this before ....it was a real challenge. Although it is far from perfect...I am pretty darn proud of my progress. It will be completed tomorrow and I will update my blog with the finished cake but for now...here is what I have accomplished:

Buttercream crumb coat to lock in crumbs and provide a  sticky surface to adhere the rolled fondant.


Stacked and rolled fondant in place.

Ready for decoration!

Grapes and vines made of gum paste and marzipan.

Tomorrow will do piping borders around middle and bottom, add leaves and touch up work to finish. Will update pictures after class with final results!

Saturday, March 20, 2010

Chocolatey Deliciousness

A sampling of some of Friday's accomplishments at Cocoamoda....cassis truffles lined up like little chocolate soldiers. These are topped with a bit of gold leaf.
Each truffle is filled with ganache, enrobed in chocolate couverture and embellished with a decoration--- ALL BY HAND! It's truly a labor of love.

Thursday, March 18, 2010

Flourless Chocolate Cake

This one is a class favorite! We have made this a few times and each time we all agree that this one is going on our short list of things to make to wow people. It's a cake by name but since there is no flour, it has more of a dense mousse taste/feel. Be sure to use very good chocolate as there are only a few ingredients in this recipe, so it's important to make them all count. We baked these in silicone molds shaped like pyramids so as to serve them as single plated desserts. But we did also bake in pans to slice and serve as well. No icing is needed and you can serve with raspberry sauce on the side, fresh berries, whipped cream or however you see fit. It's actually delicious just by itself as it is so decadent. Enjoy!

Flourless Chocolate Cake
Heavy Cream                           12 ounces
Butter                                        3 ounces
Dark Chocolate                         1 pound and 2 ounces
Eggs                                          7 each
Sugar                                        3.5 ounces 
Boil heavy cream. Pour over butter and chocolate. Stir until all chocolate has melted. Whip eggs and sugar until ribbon stage. Fold chocolate mixture into whipped egg mixture. Pipe mixture into molds (or pour into cake pans lined with parchment paper). Bake at 350F in a water bath until cake springs back to light touch. This is a large recipe so you can either half it or they freeze nicely. You just thaw them in the fridge whenever you have guests to wow!